
The Digital Commons is College of DuPage's institutional repository. The COD Library manages several collections on the Digital Commons, including ESSAI and The Prairie Light Review. This guide provides instructions for uploading and managing content in these collections. Downloadable instructions are available at the bottom of the page.
To add or manage content, you will first need to obtain a user name and password from the Digital Commons Administrator/Humanities Librarian, Ken Orenic, or Colin Koteles, Web Services Librarian.
For more information, see our public Digital Commons general information or faculty information pages, or visit the Digital Commons at http://dc.cod.edu.

To print these instructions, please download the attached documents at the bottom of this page.
Extracting ESSAI pages
Before uploading a volume of ESSAI to the Digital Commons, each section of the volume needs to be extracted as a separate PDF file. You will also need to create a thumbnail image of the issue's front and back covers.
Getting Started
- Obtain a PDF document containing the full ESSAI volume on which you are working from the librarian in charge of the ESSAI collection on the Digital Commons.
- Obtain a print copy of the volume. ESSAI volumes from the last three years are located in the general collection (Call #: PE1404 .E772). If a recently released volume is not there, it may be in the process of being cataloged.
- Confirm that all articles/matter from the print volume are present (with correctly numbered pages) in the PDF document.
Extracting Pages
- Open the PDF document in Adobe Acrobat
- Extract each section into a separate PDF document
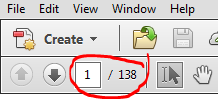
- Determine the first and last page numbers of the section you plan to extract. Note: use the page numbers shown in the Adobe toolbar, not those listed at the bottom of each PDF page.
- Navigate to the first page of the section
- Click on the “extract page” button in the toolbar.

Note: if the “extract page” button is not in the toolbar, go to the “View” menu, then “Tools,” and click on “Pages.” In the tools pane that appears on the right, right click on “Extract” under the subheading “Manipulate Pages,” then click “Add to Quick Tools Toolbar.” - Enter the number of the first and last page of the section in the “Extract Pages” window that appears. Check the box next to “Delete pages after extracting,” and click “OK.”
- The extracted pages will appear in a separate window. In this window, go to the “File” menu, and click “Save.”
- Choose a folder location in which to save the document, and name the file according to the table below. Click “Save.” By default, the document will be saved as a PDF.
Section File Name Convention Sample File Name Front Cover frontcover-[creator last name] frontcover-dygdon Title Page [first page of section]-title i-title Awards and Recognitions [first page of section]-awards ii-awards Acknowledgements [first page of section]-acknowledgements iii-acknowledgements Epigraph [first page of section]-epigraph iv-epigraph Foreword [first page of section]-foreword v-foreword Table of Contents [first page of section]-tableofcontents vi-tableofcontents Article [first page of section]-[author last name] 27-franklin Tribute to Faculty [first page of section]-tributetofaculty 125-tributetofaculty Cumulative Index of Student Authors [first page of section]-cumulativeindex 126-cumulativeindex *Note: Some of the sections above do not appear in every volume of ESSAI, and other sections may be added.
- Determine the first and last page numbers of the section you plan to extract. Note: use the page numbers shown in the Adobe toolbar, not those listed at the bottom of each PDF page.
Creating a Cover Page Thumbnail Image
This .png thumbnail image will be used on the issue's home page in the Digital Commons.
- While viewing the front cover in Adobe Acrobat, go to the “File” menu, and select “Take a Snapshot.”
- Click anywhere on the image to take a snapshot of the entire page.
- Paste the image into Paint (or another image editor)
- While viewing the back cover in Adobe Acrobat, go to the “File” menu, and select “Take a Snapshot.”
- Click anywhere on the image to take a snapshot of the entire page.
- Paste the image into Paint beneath the front cover image, leaving white space between the two images.
- Crop out any other white space that remains around the images.
- Use the “Resize” tool to change the composite image dimensions to 225 pixels wide (maintain the aspect ratio) by approximately 600 pixels high. Take note of the height in pixels (you will need this when uploading the image)
- Again, crop out any white space around the outside of the composite image (keep the white space that separates the two images).
- From the “File” menu, select “Save As” then “.png”
- Name the file issue_art, and save it to the desired location.
Wrapping it Up
These files can now be uploaded to the Digital Commons. For help with this step, see the “Creating, uploading, and publishing ESSAI volumes” instructions, which follow.
Creating, uploading, and publishing ESSAI volumes
Getting Started
- Log in to the Digital Commons - http://dc.cod.edu/
- Browse to the ESSAI gallery and click “Configuration”
Creating Volumes
- Check to see if a page has already been created for the volume/issue on which you are working. Look for the volume number under “Contents of this IR_Journal.”
- If the volume is not listed, create the volume and then the issue in the Digital Commons
- Click “Volume” next to the heading “Create New."
- Enter the volume number, and click "Add volume."
- Enter 05/01/xxxx (for example: 05/01/2014) into the Publication Date field, and click “Submit changes.”
- Proceed to the section labeled “Creating Issues” in these instructions.
- If the volume is listed, click on its link.
- If the issue is listed, proceed to the section Publishing Issues in these instructions.
- If the issue is not listed, proceed to the next section (“Creating Issues”) in these instructions.
Creating Issues
- On the volume configuration page, click “issue” next to the heading “Create New.”
- Type "1" into the Issue Number field, and click “Add Issue.”
- Complete the following fields:
- Issue date: 05/01/xxxx (for example: 05/01/2014)
- Optional Editor’s Note/Issue Introductory Text: Using HTML tags, enter the Foreword text. Do not include the list of editorial board members.
- Issue cover art: Upload the cover art image (a .png file). For help creating this .png file, view the instructions for Creating a Thumbnail Image
- Cover Art WIDTH: 225
- Cover Art HEIGHT: Enter the height of the .png image you created.
- Cover Art alt Parameter: Enter “ESSAI volume xx cover” (e.g., “ESSAI volume 11 cover”)
- Display Issue Editorial Board: Check the box.
- Editorial Board (HTML): Using the provided template, enter all members of the editorial board as listed in the Foreword of the printed volume
- Click “Submit Changes.”
- In the left-hand column, click “Update Site.”
Uploading Issue Contents
Individual sections must be uploaded to the DC in the order that they appear in the print volume, according to the following instructions. These sections should have been previously extracted from the full volume PDF (see Extracting Pages). From the Configuration page, select "Upload Submission," or from your "My Account" page, browse to the ESSAI gallery, and select "Upload."
Front Cover
- Click “Add Author”
- Enter the artist's first name and last name in the appropriate fields (this information can be found on the Acknowledgements page)
- Enter “College of DuPage” in the Institution field
- Click “Add to list of authors”
- Add any additional authors in the same manner
- Click “continue”
- Article title: “Front Cover.”
- Document Type: Prefatory Note
- Upload the PDF of the volume front cover (the DC will automatically generate a “cover page” PDF containing author information and a recommended citation)
- Click “Submit”
Prefatory Matter
- Continue past the author page without adding any authors
- Article title:
- Enter “Title Page” for the title page
- Enter "Epigraph" for the page containing an epigraph (just prior to the Foreword)
- For remaining prefatory materials, enter the heading of each section into the Article Title field (e.g., "Awards and Recognitions")
- Publication Date: Enter the season (Spring) and year
- Document Type: Prefatory Note
- Upload the appropriate PDF
- Click “Submit”
Articles
- Click “Add Author.” Enter the author’s first name and last name in the appropriate fields. Enter “College of DuPage” in the Institution field. Click “Add to list of authors.” Add any additional authors in the same manner.
- Article Title: Enter full article title
- Short Title: If the article title exceeds 65 characters, enter the first few words of the title in the Short Title field
- Publication Date: Enter the season (Spring) and year
- Keywords: Pick 2-3 keywords (4-5 at most)
- If you wish to use a proper name as a keyword (only needed if the name is not the creator's name or in the title), use the last name only
- Subject Area: Preferably assign one subject area. However, if there are two obvious subjects, pick two.
- Document Type: Selection
- Leave the Abstract and Cover Page Footnote fields blank
- Upload the appropriate PDF
- Click "Submit"
Back Matter
- Continue past the author page without adding any authors.
- Article title: enter the heading of the section (e.g., “Tribute to Faculty”)
- Publication Date: Enter the season (Spring) and year
- Document Type: Back Matter.
- Upload the appropriate PDF.
- Click “Submit.”
Publishing Issues
The uploaded sections will not be publicly available until they have been published as part of a volume. In the Digital Commons, this is referred to as “closing” an issue.
Note: This step cannot be reversed. Confirm that all information and uploads are present and in order before completing this step.
- From the Configuration page, click “Manage submissions.”
- Select “View/Close Issue” from the left-hand column.
- Select the volume/issue you wish to publish, and click “Continue.”
- The volume/issue will be empty. Add uploaded materials to the volume/issue:
- Follow the link within “Click here to edit this issue.”
- Select all items you wish to add to the issue and click “Add.”
- Confirm that all entries are listed in the order in which they appear in the print volume. You can rearrange their order using the drop-down “order” menus to the left of each entry.
- Click “Submit changes.”
- Select “View/Close Issue” from the left-hand column.
- Select the volume/issue you wish to publish, and click “Continue.”
- Click “Close Issue” at the bottom of the page.
- Click “Update.”
To print these instructions, please download the attached documents at the bottom of this page.
Extracting Prairie Light Review pages
Before uploading an issue of Prairie Light Review (PLR) to the Digital Commons, each section of the issue needs to be extracted as a separate PDF file. You will also need to create a thumbnail image of the issue's front and back covers.
Getting Started
- Obtain a PDF document containing the full PLR issue on which you are working from the librarian in charge of the PLR collection on the Digital Commons.
- Obtain a print copy of the issue. PLR issues from the last three years are located in Periodicals. If a recently released issue is not there, it may be in the process of being cataloged. Older issues are located in the Bound Periodicals and Archives.
- Confirm that all articles/matter from the print issue are present (with correctly numbered pages) in the PDF document.
Extracting Pages
- Open the PDF document in Adobe Acrobat
- Extract each section into a separate PDF document
- Determine the first and last page numbers of the section you plan to extract. Note: use the page numbers shown in the Adobe toolbar, not those listed at the bottom of each PDF page.
- Navigate to the first page of the section
- Click on the “extract page” button in the toolbar.
Note: if the “extract page” button is not in the toolbar, go to the “View” menu, then “Tools,” and click on “Pages.” In the tools pane that appears on the right, right click on “Extract” under the subheading “Manipulate Pages,” then click “Add to Quick Tools Toolbar.” - Enter the number of the first and last page of the section in the “Extract Pages” window that appears. Check the box next to “Delete pages after extracting,” and click “OK.”
- The extracted pages will appear in a separate window. In this window, go to the “File” menu, and click “Save.”
- Choose a folder location in which to save the document, and name the file according to the table below. Click “Save.” By default, the document will be saved as a PDF.
Section File Name Convention Sample File Name Front Cover frontcover-[creator last name] frontcover-dygdon Title Page [first page of section]-title i-title Editorial Team [first page of section]-editorial team ii-editorial team Letter from the Editor [first page of section]-letter iii-letter Submission Guidelines [first page of section]-submission iv-submission Special Thanks [first page of section]-specialthanks vi-specialthanks A Note About the Text [first page of section]-note vi-note Table of Contents [first page of section]-tableofcontents vii-tableofcontents Selection [first page of section]-[author last name] 1-thornsbury Artwork [first page of section]-[creator last name] 22-burgan Back Cover backcover-[creator last name] *Note: Some of the sections above do not appear in every issue of PLR, and other sections may be added.
- Determine the first and last page numbers of the section you plan to extract. Note: use the page numbers shown in the Adobe toolbar, not those listed at the bottom of each PDF page.
Creating a Cover Page Thumbnail Image
This .png thumbnail image will be used on the issue's home page in the Digital Commons.
- While viewing the front cover in Adobe Acrobat, go to the “File” menu, and select “Take a Snapshot.”
- Click anywhere on the image to take a snapshot of the entire page.
- Paste the image into Paint (or another image editor)
- While viewing the back cover in Adobe Acrobat, go to the “File” menu, and select “Take a Snapshot.”
- Click anywhere on the image to take a snapshot of the entire page.
- Paste the image into Paint beneath the front cover image, leaving white space between the two images.
- Crop out any other white space that remains around the images.
- Use the “Resize” tool to change the composite image dimensions to 202 pixels wide (maintain the aspect ratio) by approximately 640 pixels high. Take note of the height in pixels (you will need this when uploading the image)
- Again, crop out any white space around the outside of the composite image (keep the white space that separates the two images).
- From the “File” menu, select “Save As” then “.png”
- Name the file issue_art, and save it to the desired location.
Wrapping it Up
These files can now be uploaded to the Digital Commons. For help with this step, see the “Creating, uploading, and publishing Prairie Light Review issues” instructions, which follow.
Creating, uploading, and publishing Prairie Light Review issues
Getting Started
- Log in to the Digital Commons - http://dc.cod.edu/
- Browse to the Prairie Light Review gallery and click “Configuration”
Creating Volumes
- Check to see if a page has already been created for the volume/issue on which you are working. Look for the volume number under “Contents of this IR_Journal.”
- If the volume is not listed, create the volume and then the issue in the Digital Commons
- Click “Volume” next to the heading “Create New."
- Enter the volume number, and click "Add volume."
- Do not enter a publication date. Click "Submit changes."
- Proceed to the section labeled “Creating Issues” in these instructions.
- If the volume is listed, click on its link.
- If the issue is listed, proceed to the section Publishing Issues in these instructions.
- If the issue is not listed, proceed to the next section (“Creating Issues”) in these instructions.
Creating Issues
- On the volume configuration page, click “issue” next to the heading “Create New.”
- Type the issue number into the "Issue Number" field, and click “Add Issue.”
- Complete the following fields:
- Issue date: For fall issues, enter 12/01/xxxx (for example: 12/01/2014). For spring issues, enter 05/01/xxxx.
- Optional editor’s note: If the print issue was assigned incorrect volume information (e.g., there are two volumes of Prairie Light Review designated as Vol 35, No 1), and the volume/issue numbering has been corrected in the Digital Commons, enter “This issue was incorrectly published in print as Volume xx, Number x”
- Issue cover art: Upload the cover art image (a .png file). For help creating this .png file, view the instructions for Creating a Thumbnail Image
- Cover Art WIDTH: 202
- Cover Art HEIGHT: Enter the height of the .png image you created.
- Cover Art alt Parameter: Enter “front and back cover of the Prairie Light Review."
- Display Issue Editorial Board: Check the box.
- Editorial Board (HTML): Using the provided template, enter all members of the editorial board as listed in the "Editorial Staff" or "Editorial Team" section of the printed issue
- Display Additional Issue Information: Check the box
- Additional Issue Information (HTML): Delete the existing text, and enter "Contact the Prairie Light Review staff at: http://www.cod.edu/student_life/prairie_light_review/" within paragraph tags (create a hyperlink for the PLR website).
- Click “Submit Changes.”
- In the left-hand column, click “Update Site.”
Uploading Issue Contents
Individual sections must be uploaded to the DC in the order that they appear in the print issue, according to the following instructions. These sections should have been previously extracted from the full issue PDF (see Extracting Pages).
Front Cover
- Click “Add Author”
- Enter the artist's first name and last name in the appropriate fields (this information can be found on the title page)
- Enter “College of DuPage” in the Institution field
- Click “Add to list of authors”
- Add any additional authors in the same manner
- Click “continue”
- Article title: “Front Cover.” (If a title is listed for the cover image, complete the article title field as "Front Cover - '[artwork title]'"
- Publication Date: For fall issues, enter Fall December 1 [year]. For spring issues, enter Spring May 1 [year].
- Document Type: Artwork
- Select Type: Double click on the appropriate selection type(s) from the "Available" list.
- Upload the PDF of the issue front cover (the DC will automatically generate a “cover page” PDF containing author information and a recommended citation)
- Click “Submit”
Prefatory Matter
- Continue past the author page without adding any authors
- Article title:
- Enter “Title Page” for the title page
- For remaining prefatory materials, enter the heading of each section into the Article Title field (e.g. “Submission Guidelines”)
- Publication Date: For fall issues, enter Fall December 1 [year]. For spring issues, enter Spring May 1 [year].
- Document Type: Prefatory Note
- Upload the appropriate PDF
- Click “Submit”
Selections (prose/verse) and Artwork
- Click “Add Author.” Enter the author’s or artist's first name and last name in the appropriate fields. Enter “College of DuPage” in the Institution field. Click “Add to list of authors.” Add any additional authors in the same manner.
- Article Title: Enter full title of the piece
- Short Title: If the article title exceeds 65 characters, enter the first few words of the title in the Short Title field
- Publication Date: For fall issues, enter Fall December 1 [year]. For spring issues, enter Spring May 1 [year].
- Keywords: If needed, assign up to 3 keywords (4-5 at most)
- For artwork: if the medium is not listed in the list of available types, enter the medium (e.g., etching) as a keyword
- If you wish to use a proper name as a keyword (only needed if the name is not the creator's name or in the title), use the last name only
- Document Type: Selection (for prose and verse) or Artwork
- Selection Type: Select the appropriate selection type (e.g., digital artwork, photograph, etc.) from the list
- Leave the Abstract and Cover Page Footnote fields blank
- Upload the appropriate PDF
- Click "Submit"
Back Matter (if any)
- Continue past the author page without adding any authors.
- Article title: enter the heading of the section.
- Publication Date: For fall issues, enter Fall December 1 [year]. For spring issues, enter Spring May 1 [year].
- Document Type: Back Matter.
- Upload the appropriate PDF.
- Click “Submit.”
Back Cover
- Click “Add Author”
- Enter the artist's first name and last name in the appropriate fields (this information can be found on the title page)
- Enter “College of DuPage” in the Institution field
- Click “Add to list of authors”
- Add any additional authors in the same manner
- Click “continue”
- Article title: “Back Cover.” (If a title is listed for the cover image, complete the article title field as "Back Cover - '[artwork title]'"
- Publication Date: For fall issues, enter Fall December 1 [year]. For spring issues, enter Spring May 1 [year].
- Document Type: Artwork
- Select Type: Double click on the appropriate selection type(s) from the "Available" list.
- Upload the PDF of the issue back cover
- Click “Submit”
Publishing Issues
The uploaded sections will not be publicly available until they have been published as part of an issue. In the Digital Commons, this is referred to as “closing” an issue.
Note: This step cannot be reversed. Confirm that all information and uploads are present and in order before completing this step.
- From the Configuration page, click “Manage submissions.”
- Select “View/Close Issue” from the left-hand column.
- Select the volume/issue you wish to publish, and click “Continue.”
- The volume/issue will be empty. Add uploaded materials to the volume/issue:
- Follow the link within “Click here to edit this issue.”
- Select all items you wish to add to the issue and click “Add.”
- Confirm that all entries are listed in the order in which they appear in the print volume. You can rearrange their order using the drop-down “order” menus to the left of each entry.
- Click “Submit changes.”
- Select “View/Close Issue” from the left-hand column.
- Select the volume/issue you wish to publish, and click “Continue.”
- Click “Close Issue” at the bottom of the page.
- Click “Update.”